
| 일 | 월 | 화 | 수 | 목 | 금 | 토 |
|---|---|---|---|---|---|---|
| 1 | ||||||
| 2 | 3 | 4 | 5 | 6 | 7 | 8 |
| 9 | 10 | 11 | 12 | 13 | 14 | 15 |
| 16 | 17 | 18 | 19 | 20 | 21 | 22 |
| 23 | 24 | 25 | 26 | 27 | 28 |
- 스프링부트
- 자바제너릭
- 제이피큐엘쿼리
- JPAmapping
- javageneric
- springboot기본설정
- embededtype
- Open EntityManager
- httppie
- 임베디드타입
- OSIV
- spring
- Git
- jpqlquery
- MySqlType
- 에이치투데이터베이스
- 이해와 원리
- dockercmd
- JPA Hint & Lock
- springbootproxy
- JDBC connection pool
- 데이터베이트h2
- springbootH2
- JPA프록시
- JPAproxy
- gitinitial
- jpa
- sql
- JPA값타입
- 스프링부트기본설정
- Today
- Total
빡코
[Spring] 기본개념 본문
설정 정보는 Application Root에 두는 것이 좋다.
스프링컨테이너
ApplicationContext를 스프링컨테이너라 한다.
기존에는 개발자가 AppConfig를 사용해서 직접객체를 생성하고 DI를 했지만, 이제부터는 스프링컨테이너를 통해서 사용한다.
스프링컨테이너는@Configuration이 붙은 AppConfig를 설정(구성) 정보로 사용한다.
여기서@Bean이라 적힌 메서드를 모두호출해서 반환된 객체를 스프링컨테이너에 등록한다. 이렇게 스프링컨테이너에 등록된 객체를 스프링빈이라 한다. 스프링빈은@Bean이 붙은 메서드의 명을 스프링빈의 이름으로 사용한다. (memberService, orderService)
이전에는 개발자가 필요한 객체를 AppConfig를 사용해서 직접 조회했지만, 이제부터는 스프링컨테이너를 통해서 필요한 스프링빈(객체)를 찾아야한다.
스프링빈은 applicationContext.getBean() 메서드를 사용해서 찾을 수 있다.
기존에는 개발자가 직접자바코드로 모든 것을 했다면 이제부터는 스프링컨테이너에 객체를 스프링빈으로 등록하고, 스프링컨테이너에서 스프링빈을 찾아서 사용하도록 변경되었다
.Spring Config 설정
package hello.core;

import hello.core.discount.DiscountPolicy;
import hello.core.discount.FixDiscountPolicy;
import hello.core.discount.RateDiscountPolicy;
import hello.core.member.MemberRepository;
import hello.core.member.MemberService;
import hello.core.member.MemberServiceImpl;
import hello.core.member.MemoryMemberRepository;
import hello.core.order.OrderService;
import hello.core.order.OrderServiceImpl;
import org.springframework.context.annotation.Bean;
import org.springframework.context.annotation.Configuration;

@Configuration
public class AppConfig {

    @Bean
    public MemberService memberService() {
        return new MemberServiceImpl(memberRepository());
    }

    @Bean
    public MemberRepository memberRepository() {
        return new MemoryMemberRepository();
    }

    @Bean
    public OrderService orderService(){
        return new OrderServiceImpl(memberRepository(), discountPolicy());
    }

    @Bean
    public DiscountPolicy discountPolicy(){
        //return new FixDiscountPolicy();
        return new RateDiscountPolicy();
    }
}
xml 형식으로 설정한 경우
appConfig.xml 파일

<?xml version="1.0" encoding="UTF-8"?>
<beans xmlns="http://www.springframework.org/schema/beans"
       xmlns:xsi="http://www.w3.org/2001/XMLSchema-instance"
       xsi:schemaLocation="http://www.springframework.org/schema/beans http://www.springframework.org/schema/beans/spring-beans.xsd">

    <bean id="memberService" class="hello.core.member.MemberServiceImpl" >
        <constructor-arg name="memberRepository" ref="memberRepository"/>
    </bean>
    <bean id="memberRepository" class="hello.core.member.MemoryMemberRepository"/>
    <bean id="orderService" class="hello.core.order.OrderServiceImpl">
        <constructor-arg name="memberRepository" ref="memberRepository"/>
        <constructor-arg name="discountPolicy" ref="discountPolicy"/>
    </bean>
    <bean id="discountPolicy" class="hello.core.discount.RateDiscountPolicy"/>
</beans>


package hello.core.xml;

import hello.core.member.MemberService;
import org.assertj.core.api.Assertions;
import org.junit.jupiter.api.Test;
import org.springframework.context.ApplicationContext;
import org.springframework.context.support.GenericXmlApplicationContext;

public class XmlAppContext {

    @Test
    void xmlAppContext(){
        ApplicationContext ac = new GenericXmlApplicationContext("appConfig.xml");
        MemberService memberService = ac.getBean("memberService", MemberService.class);
        Assertions.assertThat(memberService).isInstanceOf(MemberService.class);

    }
}
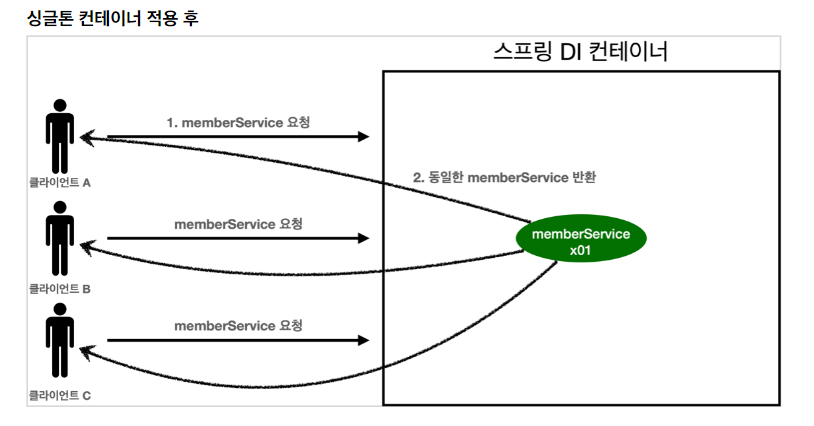
싱글톤 패턴 과 스프링 컨테이너 (+ @Configuration)
-싱글톤 객체는 상태를 유지(stateful)하게 설계하면 안되고, 무상태(stateless)로 설계해야 함.
(특정 클라이언트 의존적 필드 생성 x, 특정 클라이언트가 값 변경할 수 있는 필드 x, 가급적 읽기만 가능,지역변수&파라미터&ThreadLoacl 등을 사용해야 한다)
-클래스의 인스턴스가 딱 1개만 생성되는 것을 보장하는 디자인 패턴이다(필수)
-스프링 컨테이너는 객체 인스턴스를 싱글톤으로 관리한다.
-스프링 컨테이너 덕분에 클라이언트 요청이 올떄, 이미 만들어진 객체를 공유해서 효율적으로 재상용 할 수 있다.
-@Configuration 어노테이션을 사용하면, 순수 클래스가 아닌 스프링에 의하여 CGLIB라는 바이트 조작 라이브러리를 사용하여 설정클래스(ex. AppConfig.cls)를 상속받은 임의의 클래스를 생성, 그 다른 클래스를 스프링 빈으로 등록함. 이 임의 다른 클래스가 바로 싱글톤이 보장되도록 해준다.
-@Bean이 붙은 매서드 마다 이미 스프링 빈이 존재하면 존재하는 빈을 반환하고, 스프링 빈이 없으면 생성해서 스프링 빈을 등록하고 반환하는 코드가 동적으로 만들어진다. => 싱글톤 보장
@ComponentScan 어노테이션
-컴포넌트 스캔은 이름 그대로 @Component 어노테이션이 붙은 클래스를 스캔해서 스프링 빈으로 등록한다.
@Autowired
-생성자에 @Autowired를 붙여주면 의존관계를 자동으로 주입해준다. ex) @Autowired == ac.getBean(MemberRepository.class)
스프링 컨테이너 제외 필터 및 기본 스캔 대상 설정
탐색 시작 위치를 지정하지 않을 경우
@ComponentScan이 붙은 설정 정브 클래스의 패키지가 스캔 시작 위치가 된다
SpringBoot에서는 @ComponentScan으로 돌아간다. @SpringBootApplication를 프로젝트 시작 위치에 두는 것이 관례이다.
컴포넌트스캔
기본대상컴포넌트스캔은
@Component 뿐만 아니라 다음과 내용도 추가로 대상에 포함한다.
@Component: 컴포넌트스캔에서 사용
@Controlller: 스프링 MVC 컨트롤러에서 사용
@Service: 스프링비즈니스로직에서 사용
@Repository: 스프링데이터접근계층에서 사용
@Configuration: 스프링설정정보에서 사용
@Controller: 스프링 MVC 컨트롤러로 인식
@Repository: 스프링데이터접근계층으로 인식하고, 데이터계층의 예외를 스프링예외로 변환해 준다.
@Configuration: 앞서보았듯이 스프링설정정보로 인식하고, 스프링빈이싱글톤을 유지하도록 추가처리를 한다.
@Service: 사실@Service는 특별한 처리를 하지 않는다. 대신개발자들이 핵심비즈니스로직이 여기에 있겠구나라고 비즈니스계층을 인식하는데 도움이 된다
	1. @interface 사용하여 클래스 생성
    //포함
    @Target(ElementType.TYPE) //
    @Retention(RetentionPolicy.RUNTIME)
    @Documented
    public @interface MyIncludeComponent {

    }

    //제외용
    @Target(ElementType.TYPE) //
    @Retention(RetentionPolicy.RUNTIME)
    @Documented
    public @interface MyExcludeComponent {

    }
	//적용/제외 예제 클래스 생성
	@MyExcludeComponent
    public class BeanB {
    }

    @MyIncludeComponent
    public class BeanA {
    }

	//테스트 클래스

    @Test
    void filterScan(){

        ApplicationContext ac = new AnnotationConfigApplicationContext(ComponentFilterAppConfig.class);
        BeanA beanA = ac.getBean("beanA", BeanA.class);
        Assertions.assertThat(beanA).isNotNull(); //값이 조회가 되어야 하고

        assertThrows( //해당 에러가 발생해야 한다.
                NoSuchBeanDefinitionException.class,
                () -> ac.getBean(" beanB", BeanB.class)
        );

    }

    @Configuration
    @ComponentScan(
            includeFilters = @Filter(type = FilterType.ANNOTATION, classes = MyIncludeComponent.class),//스프링 빈에 등록
            excludeFilters = @Filter(type = FilterType.ANNOTATION, classes = MyExcludeComponent.class)//스프링 빈에서 제거
    )
    static class ComponentFilterAppConfig{
    }
}
생성자 옵션처리
public class AutoWiredTest {

    @Test
    void AutoWiredOption(){
        ApplicationContext ac = new AnnotationConfigApplicationContext(TestBean.class);
    }

    static class TestBean {

        @Autowired(required = false) //의존관계가 없음으로 method 자체가 호출이 안된다.
        public void setNoBean1(Member noBean1){
            System.out.println("noBeam1 = " + noBean1);
        }

        @Autowired //자동 주입할 대상이 없으면 null이 입력된다.
        public void setNoBean2(@Nullable Member noBean2){
            System.out.println("noBean2 = " + noBean2);
        }

        @Autowired //자동 주입하 대상이 없으면, Optional.empty가 입력된다.
        public void setNoBean3(Optional<Member> noBean3){
            System.out.println("noBean3 = " + noBean3);
        }
    }

}
Lombok
plugins {
	id 'java'
	id 'org.springframework.boot' version '2.7.7'
	id 'io.spring.dependency-management' version '1.0.15.RELEASE'
}

group = 'hello'
version = '0.0.1-SNAPSHOT'
sourceCompatibility = '11'

//lombok 설정추가시작
configurations {
	compileOnly {
		extendsFrom annotationProcessor
	}
}
//lombok 설정추가끝

repositories {
	mavenCentral()
}

dependencies {
	implementation 'org.springframework.boot:spring-boot-starter'

	//lombok 라이브러리 추가 시작
	compileOnly 'org.projectlombok:lombok'
	annotationProcessor 'org.projectlombok:lombok'

	testCompileOnly 'org.projectlombok:lombok'
	testAnnotationProcessor 'org.projectlombok:lombok'
	//lombok 라이브러리추가끝

	testImplementation 'org.springframework.boot:spring-boot-starter-test'
}

tasks.named('test') {
	useJUnitPlatform()
}
1.Preferences(윈도우 File Settings) plugin lombok 검색설치실행 (재시작)
2.Preferences Annotation Processors 검색 Enable annotation processing 체크 (재시작)
3.임의의테스트클래스를만들고 @Getter, @Setter 확인
@RequiredArgsConstructor : final이 붙은 멤버변수의 생서자를 자동으로 생성해준다(확인: control + F12
@Component
@RequiredArgsConstructor //final이 붙은 멤머변수의 생성자를 자동으로 만들어준다.
public class OrderServiceImpl implements OrderService{

    private final MemberRepository memberRepository;
    private final DiscountPolicy discountPolicy;

    @Autowired
    public OrderServiceImpl(MemberRepository memberRepository, DiscountPolicy discountPolicy) {
        this.memberRepository = memberRepository;
        this.discountPolicy = discountPolicy;
    }

    @Override
    public Order CreateOrder(Long memberId, String itemName, int itemPrice) {

        Member member = memberRepository.findById(memberId);
        int discountPrice = discountPolicy.discount(member, itemPrice);

        return new Order(memberId, itemName, itemPrice, discountPrice);

    }

    //Test
    public MemberRepository getMemberRepository(){
        return memberRepository;
    }


}
2개 이상의 빈이 조회될 경우
1. @Autowired 필드명
@AutoWired는 타입명으로 매칭을 시도하고, 이때 여러빈이 있으면 필드명, 파라미터 이름으로 빈이름을 추가 매칭한다
//필드명
@Autowired
private DiscountPolicy discountPolicy
//파라미터명
@Component
//@RequiredArgsConstructor //final이 붙은 멤머변수의 생성자를 자동으로 만들어준다.
public class OrderServiceImpl implements OrderService{
private final MemberRepository memberRepository;
private final DiscountPolicy discountPolicy;
@Autowired
public OrderServiceImpl(MemberRepository memberRepository, DiscountPolicy fixDiscountPolicy) {
this.memberRepository = memberRepository;
this.discountPolicy = fixDiscountPolicy;
}2. @Qualifier: @Qualifier끼리 매칭한다 > 못찾을 경우 빈이름으로 조회한다. > NoSuchBeanDefinitionException 예외 발생
@Component
@Qualifier("mainDiscountPolicy")
public class FixDiscountPolicy implements DiscountPolicy {

    private int discountFixAmount = 1000; // 1000원 할인

    @Override
    public int discount(Member member, int price) {

        if(member.getGrade() == Grade.VIP){

            return discountFixAmount;

        } else {

            return 0;

        }

    }
}


//OrderServiceImpl
@Component
public class OrderServiceImpl implements OrderService{

    private final MemberRepository memberRepository;
    private final DiscountPolicy discountPolicy;

    @Autowired
    public OrderServiceImpl(MemberRepository memberRepository,
    	@Qualifier("mainDiscountPolicy") DiscountPolicy discountPolicy) {
        this.memberRepository = memberRepository;
        this.discountPolicy = discountPolicy;
    }

    @Override
    public Order CreateOrder(Long memberId, String itemName, int itemPrice) {

        Member member = memberRepository.findById(memberId);
        int discountPrice = discountPolicy.discount(member, itemPrice);

        return new Order(memberId, itemName, itemPrice, discountPrice);

    }

    //Test
    public MemberRepository getMemberRepository(){
        return memberRepository;
    }


}
3. @Primary 어노테이션 지정시 우선수위 지정됨
어노테이션 직접 만들기
//어노테이션 생성
@Target({ElementType.FIELD, ElementType.METHOD, ElementType.PARAMETER, ElementType.TYPE, ElementType.ANNOTATION_TYPE})
@Retention(RetentionPolicy.RUNTIME)
@Inherited
@Documented
@Qualifier("mainDiscountPolicy")
public @interface MainDiscountPolicy {
}
//어노테이션 적용
@Component
@MainDiscountPolicy
public class RateDiscountPolicy implements DiscountPolicy {
private int discountPercent = 10;
@Override
public int discount(Member member, int price) {
if (member.getGrade() == Grade.VIP) {
return price * discountPercent / 100;
} else {
return 0;
}
}
}//적용 2
@Component
//@RequiredArgsConstructor //final이 붙은 멤머변수의 생성자를 자동으로 만들어준다.
public class OrderServiceImpl implements OrderService{
private final MemberRepository memberRepository;
private final DiscountPolicy discountPolicy;
@Autowired
public OrderServiceImpl(MemberRepository memberRepository, @MainDiscountPolicy DiscountPolicy discountPolicy) {
this.memberRepository = memberRepository;
this.discountPolicy = discountPolicy;
}
@Override
public Order CreateOrder(Long memberId, String itemName, int itemPrice) {
Member member = memberRepository.findById(memberId);
int discountPrice = discountPolicy.discount(member, itemPrice);
return new Order(memberId, itemName, itemPrice, discountPrice);
}
//Test
public MemberRepository getMemberRepository(){
return memberRepository;
}
}
조회한 빈이 모두 필요할 때
public class AllBeanTest {

    @Test
    void findAllBean(){
        ApplicationContext ac = new AnnotationConfigApplicationContext(AutoAppConfig.class, DiscountService.class);
        DiscountService discountService = ac.getBean(DiscountService.class);
        Member member = new Member(1L, "userA", Grade.VIP);

        int discountPrice = discountService.discount(member, 10000, "fixDiscountPolicy");

        assertThat(discountService).isInstanceOf(DiscountService.class);
        assertThat(discountPrice).isEqualTo(1000);

        int rateDiscountPrice = discountService.discount(member, 20000, "rateDiscountPolicy");
        assertThat(rateDiscountPrice).isEqualTo(2000);
    }

    static class DiscountService{

        private final Map<String, DiscountPolicy> policyMap;
        private final List<DiscountPolicy> polices;

        @Autowired
        public DiscountService(Map<String, DiscountPolicy> policyMap, List<DiscountPolicy> polices ) {
            this.policyMap = policyMap;
            this.polices = polices;

            System.out.println("policyMap = " + policyMap);
            System.out.println("polices = " + polices);
        }

        public int discount(Member member, int price, String discountCode) {
            DiscountPolicy discountPolicy = policyMap.get(discountCode);
            return discountPolicy.discount(member,price);
        }
    }
}
로직분석
DiscountService는 Map으로 모든 DiscountPolicy를 주입받는다. 이때 fixDiscountPolicy, rateDiscountPolicy가 주입된다.
discount () 메서드는 discountCode로 "fixDiscountPolicy"가 넘어오면 map에서 fixDiscountPolicy스프링빈을 찾아서 실행한다. 물론 “rateDiscountPolicy”가넘어오면rateDiscountPolicy스프링빈을 찾아서 실행한다.
주입분석
Map <String, DiscountPolicy>: map의 키에 스프링빈의 이름을 넣어주고, 그 값으로 DiscountPolicy타입으로 조회한 모든 스프링빈을 담아준다.
List <DiscountPolicy>:DiscountPolicy타입으로 조회한 모든 스프링빈을 담 아준다. 만약해당하는 타입의 스프링빈이 없으면, 빈컬렉션이나 Map을주입한다.
참고 - 스프링컨테이너를 생성하면서 스프링빈등록하기 스프링컨테이너는 생성자에 클래스정보를 받는다. 여기에 클래스정보를 넘기면 해당클래스가 스프링빈으로 자동등록된다.
new AnnotationConfigApplicationContext(AutoAppConfig.class, DiscountService.class);이 코드는 2가지로 나누어 이해할 수 있다. new AnnotationConfigApplicationContext()를 통해 수프링컨테이 너를 생성한다.
AutoAppConfig.class, DiscountService.class를 파라미터로 넘기면서 해당클래스를 자동으로 스프링빈으로 등록한다.
정리하면 스프링컨테이너를 생성하면서, 해당컨테이너에 동시에 AutoAppConfig, DiscountService를 스프링빈으로 자동등록한다.
수동빈과 자동등록 빈 사용 구분
//자동 빈 등록

public class AllBeanTest {

    static class DiscountService{

        private final Map<String, DiscountPolicy> policyMap;
        private final List<DiscountPolicy> polices;

        @Autowired
        public DiscountService(Map<String, DiscountPolicy> policyMap, List<DiscountPolicy>  polices) {
            this.policyMap = policyMap;
            this.polices = polices;

            System.out.println("policyMap = " + policyMap);
            System.out.println("polices = " + polices);
        }

        public int discount(Member member, int price, String discountCode) {
            DiscountPolicy discountPolicy = policyMap.get(discountCode);
            return discountPolicy.discount(member,price);
        }
    }
}

// 수동 빈 등록
@Configuration
public class DiscountPolicyConfig{
    @Bean
    public DiscountPolicy rateDiscountPolicy(){
        return new RateDiscountPolicy();
    }
    @Bean
    public DiscountPolicy fixDiscountPolicy(){
        return new FixDiscountPolicy();
    }
}
빈 생명주기 콜백
스프링 빈의 라이프 사이클
객체생성 > 의존관계 주입 일어남
스프링 컨테이너 생성 -> 스프링 빈 생성 -> 의존관계주입(Field Injection) -> 초기화 콜백(초기화 완료되었으니 사용하라) -> 사용 > 소멸전 콜백 -> 스프링 종료
-객체의 생성과 초기화를 분리하자.
인터페이스(InitializingBean, DisposableBean) - 초창기 사용 방법
-스프링 빈 생명주기 콜백을 활용하여 스프링 의존관계 주입이 끝나면 주입을 시도한다.
package hello.core.lifecycle;

import org.springframework.beans.factory.DisposableBean;
import org.springframework.beans.factory.InitializingBean;

public class NetworkClient implements InitializingBean, DisposableBean {

    private String url;

    public NetworkClient(){
        System.out.println("생성자 호출, url = " + url);

    }

    public void setUrl(String url){
        this.url = url;
    }

    //서비스 시작시 호출
    public void connect(){
        System.out.println("Connect + "+url);
    }

    public void call(String message) {
        System.out.println("Message = " +message);
    }

    //서비스 종료시 호출
    public void disconnect(){
        System.out.println("close : " + url);
    }

    @Override
    public void afterPropertiesSet() throws Exception {
        //스프링의 의존관계 주입이 끝나면 주입을 한다는 내용
        connect();
        call("초기화 연결 메세지");
    }

    @Override
    public void destroy() throws Exception {
        disconnect();
    }
}
설정 정보에 초기화 메서드, 종료메서드지정
public class BeanLifeCycleTest {

    @Test
    public void lifeCycleTest(){
        //부모는자식을 다룰 수 있다.
        ConfigurableApplicationContext ac  = new AnnotationConfigApplicationContext(LifeCycleConfig.class);
        NetworkClient client = ac.getBean(NetworkClient.class);
        ac.close();
    }

    @Configuration
    static class LifeCycleConfig{

        @Bean(initMethod = "init", destroyMethod = "close") //close대신 공백으로 놓아도 된다.
        public NetworkClient networkClient(){
            NetworkClient networkClient = new NetworkClient();
            networkClient.setUrl("http://hllo-spring.dev");
            return networkClient;
        }
    }
}

//테스트 클래스
package hello.core.lifecycle;

import org.springframework.beans.factory.DisposableBean;
import org.springframework.beans.factory.InitializingBean;

public class NetworkClient {

    private String url;

    public NetworkClient(){
        System.out.println("생성자 호출, url = " + url);

    }

    public void setUrl(String url){
        this.url = url;
    }

    //서비스 시작시 호출
    public void connect(){
        System.out.println("Connect + "+url);
    }

    public void call(String message) {
        System.out.println("Message = " +message);
    }

    //서비스 종료시 호출
    public void disconnect(){
        System.out.println("close : " + url);
    }


    public void init(){
        //스프링의 의존관계 주입이 끝나면 주입을 한다는 내용
        connect();
        call("초기화 연결 메세지");
    }


    public void close(){
        disconnect();
    }
}
@PostConstruct, @PreDestroy 애노테이션지원
-Spring에서 권장하는 방법
public class NetworkClient {

    private String url;

    public NetworkClient(){
        System.out.println("생성자 호출, url = " + url);

    }

    public void setUrl(String url){
        this.url = url;
    }

    //서비스 시작시 호출
    public void connect(){
        System.out.println("Connect + "+url);
    }

    public void call(String message) {
        System.out.println("Message = " +message);
    }

    //서비스 종료시 호출
    public void disconnect(){
        System.out.println("close : " + url);
    }

    @PostConstruct
    public void init(){
        //스프링의 의존관계 주입이 끝나면 주입을 한다는 내용
        connect();
        call("초기화 연결 메세지");
    }

    @PreDestroy
    public void close(){
        disconnect();
    }
}
@PostConstruct, @PreDestroy 애노테이션을사용하자
코드를 고칠수없는 외부라이브러리를 초기화, 종료해야하면 @Bean의 initMethod, destroyMethod를 사용하자.
빈 스코프
프로토타입 빈
1. 클라이언트가 프로토타입 스코프의 빈을 스프링 컨터이너에 요청한다.
2.스프링 컨테이너는 이 시점에 프로토타입 빈을 생성하고, 필요한 의존 관계를 주입한다.
3.스프링 컨테이너는 생성한 프로토타입 빈을 클라이언트에게 반환한다.
4. 이후에 스프링 컨테이너에 같은 요청이 오면 항상 새로운 프로토타입 빈을 생성해서 반환한다.
이후 스프링 컨테이너는 더는 빈을 관리하지 않고, 클라이언트가 관리한다. 클라이언트가 종료 Method를 호출해주어야 한다.
package hello.core.scope;

import org.assertj.core.api.Assertions;
import org.junit.jupiter.api.Test;
import org.springframework.context.annotation.AnnotationConfigApplicationContext;
import org.springframework.context.annotation.Scope;
import javax.annotation.PostConstruct;
import javax.annotation.PreDestroy;
import static org.assertj.core.api.Assertions.assertThat;


public class PrototypeTest {

    @Test
    void prototypeBeanFind(){

        AnnotationConfigApplicationContext ac
                = new AnnotationConfigApplicationContext(ProtoTypeBean.class);
        System.out.println("find prototypeBean1");
        ProtoTypeBean prototypeBean1 = ac.getBean(ProtoTypeBean.class);
        System.out.println("find prototypeBean2");
        ProtoTypeBean prototypeBean2 = ac.getBean(ProtoTypeBean.class);

        System.out.println("prototypeBean1 = " + prototypeBean1);
        System.out.println("prototypeBean2 = " + prototypeBean2);

        Assertions.assertThat(prototypeBean1).isNotSameAs(prototypeBean2);


    }

    @Scope("prototype") //컴포넌트 스캔처럼 자등등록한다.
    static class ProtoTypeBean{

        @PostConstruct
        public void init(){
            System.out.println("ProtoTypeBean.init");
        }

        @PreDestroy
        public void destroy(){
            System.out.println("ProtoTypeBean.destroy");
        }

    }
}

//출력로그 확인

find prototypeBean1
ProtoTypeBean.init
find prototypeBean2
ProtoTypeBean.init
prototypeBean1 = hello.core.scope.PrototypeTest$ProtoTypeBean@2bb3058
prototypeBean2 = hello.core.scope.PrototypeTest$ProtoTypeBean@7a362b6b
싱글톤 타입 예제
package hello.core.scope;

import org.assertj.core.api.Assertions;
import org.junit.jupiter.api.Test;
import org.springframework.context.annotation.AnnotationConfigApplicationContext;
import org.springframework.context.annotation.Scope;
import javax.annotation.PostConstruct;
import javax.annotation.PreDestroy;

import static org.assertj.core.api.Assertions.assertThat;

public class SingleTonTest {

    @Test
    void singletonBeanFind(){

        AnnotationConfigApplicationContext ac = new AnnotationConfigApplicationContext(SingletonBean.class);

        SingletonBean singletonBean1 = ac.getBean(SingletonBean.class);
        SingletonBean singletonBean2 = ac.getBean(SingletonBean.class);

        System.out.println("singletonBean1 = " + singletonBean1);
        System.out.println("singletonBean2 = " + singletonBean2);

        assertThat(singletonBean1).isSameAs(singletonBean2);

        ac.close();

    }

    @Scope("singleton")
    static class SingletonBean{

        @PostConstruct
        public void init(){
            System.out.println("SingletonBean.init");
        }

        @PreDestroy
        public void destroy(){
            System.out.println("SingletonBean.destroy");
        }

    }
}

//출력 로그
SingletonBean.init
singletonBean1 = hello.core.scope.SingleTonTest$SingletonBean@2bb3058
singletonBean2 = hello.core.scope.SingleTonTest$SingletonBean@2bb3058
15:59:04.774 [main] DEBUG org.springframework.context.annotation.AnnotationConfigApplicationContext - Closing org.springframework.context.annotation.AnnotationConfigApplicationContext@2805d709, started on Mon Jan 30 15:59:04 KST 2023
SingletonBean.destroy
Dpendency LookUP(DL): 의존관계 조회(탐색)
1. ObjectFactory, ObjectProvider
지정한 빈을 컨테이너에 대신 찾아주는 DL 서비스를 제공하는 것이 바로 ObjectProvider이다. (ObjectFactory 옛날기능)]
   @Scope("singleton")
    static class ClientBean{

        @Autowired
        private ObjectProvider<PrototypeBean> prototypeBeansProvider;

        public int logic(){
            PrototypeBean prototypeBean = prototypeBeansProvider.getObject();
            prototypeBean.addCount();
            int count = prototypeBean.getCount();
            return count;
        }
    }
2. Javax가 제공하는 provider
build.gradle dependencies 별도의 라이브러리 추가

dependencies {
	implementation 'org.springframework.boot:spring-boot-starter'
	implementation 'javax.inject:javax.inject:1'
}


 @Scope("singleton")
    static class ClientBean{

        @Autowired
        private Provider<PrototypeBean> prototypeBeansProvider;

        public int logic(){
            PrototypeBean prototypeBean = prototypeBeansProvider.get(); //스프링 컨테이너를 통해 해당 빈을 찾아서 반환한다.
            prototypeBean.addCount();
            int count = prototypeBean.getCount();
            return count;
        }
    }
웹스코프
라이브러리 추가
dependencies {
   implementation 'org.springframework.boot:spring-boot-starter'
package hello.core.common;
import org.springframework.context.annotation.Scope;
import org.springframework.stereotype.Component;
import javax.annotation.PostConstruct;
import javax.annotation.PreDestroy;
import java.util.UUID;
@Component
//이 빈은 HTTP 요청당 하나씩 생성되고, HTTP 요청이 끝나는 시점에 소멸된다
@Scope(value = "request")
public class MyLogger {
private String uuid;
private String requestURL;
//requestURL은 이빈이 생성되는 시점에는 알 수 없음으로, 외부에서 setter로 입력받는다
public void setRequestURL(String requestURL) {
this.requestURL = requestURL;
}
public void log(String message) {
System.out.println("[" + uuid +"]" + "[" + requestURL + "] " + message);
}
//이 빈이 생성되는 시점에 자동으로 @PostConstruct 메서드를 사용해서 uuid 를 저장해둔다.
//이 빈은 HTTP 요청당 하나씩 생성되므로,uuid를 저장해 두면 다른 HTTP 요청과 구분할 수 있다.
@PostConstruct
public void init() {
uuid = UUID.randomUUID().toString();
System.out.println("[" + uuid +"] request scope bean create " + this );
}
//이 빈이 소멸되는시점에 @PreDestroy를 사용해서 메시지를 남긴다
@PreDestroy
public void close(){
System.out.println("[" + uuid +"] request scope bean close " + this );
}
}package hello.core.web;
import hello.core.common.MyLogger;
import lombok.RequiredArgsConstructor;
import org.springframework.beans.factory.ObjectProvider;
import org.springframework.stereotype.Controller;
import org.springframework.web.bind.annotation.RequestMapping;
import org.springframework.web.bind.annotation.ResponseBody;
import javax.servlet.http.HttpServletRequest;
//테스트용 컨트롤러
@Controller
@RequiredArgsConstructor
public class LogDemoController {
private final LogDemoService logDemoService;
//ObjectProvider 덕분에 ObjectProvider.getObject() 호출하는 시점까지
//request scope 빈의 생성을 지연할 수 있다.
private final ObjectProvider<MyLogger> myLoggerProvider;
//ObjectProvider.getObject()를호출하시는
// 시점에는 HTTP 요청이진행중이므로 request scope 빈의생성이정상처리된다.
@RequestMapping("log-demo")
@ResponseBody
public String logDeo(HttpServletRequest request){
MyLogger myLogger = myLoggerProvider.getObject();
String requestURL = request.getRequestURI().toString();
myLogger.setRequestURL(requestURL);
myLogger.log("controller test ");
logDemoService.logic("testId");
return "OK";
}
}package hello.core.web;
import hello.core.common.MyLogger;
import lombok.RequiredArgsConstructor;
import org.springframework.beans.factory.ObjectProvider;
import org.springframework.stereotype.Service;
@Service
@RequiredArgsConstructor
public class LogDemoService {
private final ObjectProvider<MyLogger> myLoggerProvider;
public void logic(String testId) {
MyLogger myLogger = myLoggerProvider.getObject();
myLogger.log("service id = id");
}
}ObjectProvider.getObject()를 LogDemoController,LogDemoService에서 각각한번씩 따로 호출해도 같은 HTTP 요청이면 같은스프링빈이 반환된다!
아래와 같은 결과 확인이 가능하다.
[1abcd064-fefe-4a5b-85c0-0fc42b5e9108] request scope bean create hello.core.common.MyLogger@3b37b4a1
[1abcd064-fefe-4a5b-85c0-0fc42b5e9108][/log-demo] controller test
[1abcd064-fefe-4a5b-85c0-0fc42b5e9108][/log-demo] service id = id
[1abcd064-fefe-4a5b-85c0-0fc42b5e9108] request scope bean close hello.core.common.MyLogger@3b37b4a1
Proxy 방법
*CGLIB라는 라이브러리를 내 클래스로 상속 받은 가짜 프록시 객체를 만들어서 주입한다.
...
@Component
@Scope(value = "request", proxyMode = ScopedProxyMode.TARGET_CLASS)
public class MyLogger {
}
...

출력로그
myLogger = class hello.core.common.MyLogger$$EnhancerBySpringCGLIB$$91b2bc1a
[facf0364-92b8-4f24-a232-4e4d9ffc8d8b] request scope bean create hello.core.common.MyLogger@c17bdf4
[facf0364-92b8-4f24-a232-4e4d9ffc8d8b][/log-demo] controller test
[facf0364-92b8-4f24-a232-4e4d9ffc8d8b][/log-demo] service id = id
[facf0364-92b8-4f24-a232-4e4d9ffc8d8b] request scope bean close hello.core.common.MyLogger@c17bdf4
적용 대상이 클래스이면 TARGET_CLASS, 인터페이스이면 INTERFACE를 선택한다.
이렇게 하면 MyLogger의 가짜 프록시 클래스를 만들어 두고 Http Request와 상관없이 가짜 프록시 클래스를 다른 빙엔 미리 주입해 둘수 있다.
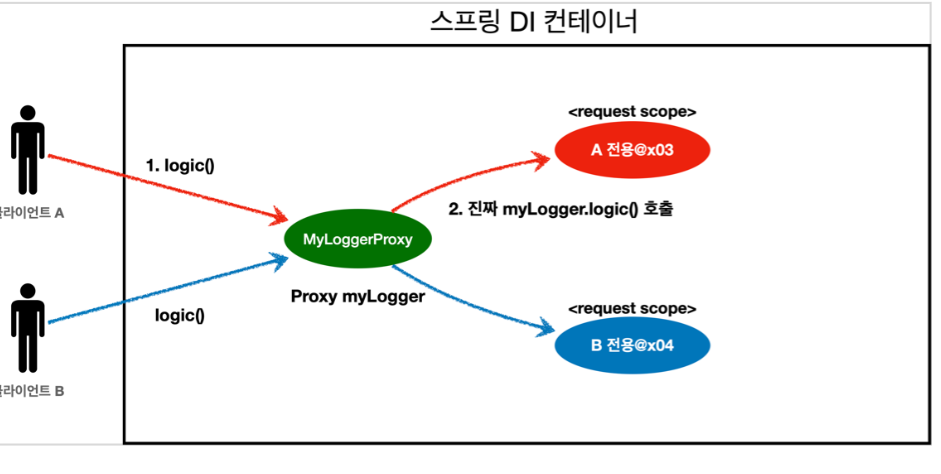
가짜 프록시 객체는 요청이 오면 그때 내부에서 진짜 빈을 요청하는 위임 로직이 들어 있다.
핵심은 진짜 객체를 조회를 꼭 필요한 시점까지 지연처리 한다는 점이다.
**출처: 김영한 - 스프링 핵심 원리 기본편 참조
'Java > Spring Framework' 카테고리의 다른 글
| 리플렉션 API 개념 및 실습 (0) | 2024.01.15 |
|---|---|
| [개념] MVC 패턴_데이터의 흐름 (0) | 2020.01.29 |
| [개념] Maven_기본개념 (0) | 2020.01.27 |
| [개념] AOP(관점지향프로그래밍) (0) | 2020.01.25 |
| [개념] 제어의 역전(IoC) + 의존성주입(DI) (0) | 2020.01.25 |


